Metroid Prime 4: Beyond is Samus Aran’s latest adventure, and while there are plenty of familiar sequences for those familiar with the series, there are some key tips, tricks, and nuances that can make your playthrough smoother and more rewarding. From early energy tank locations to mastering elemental shots and map markers, we’ve compiled our most essential Tips and Tricks for starting your adventure on planet Viewros.
Don’t Miss Scanning the Essentials
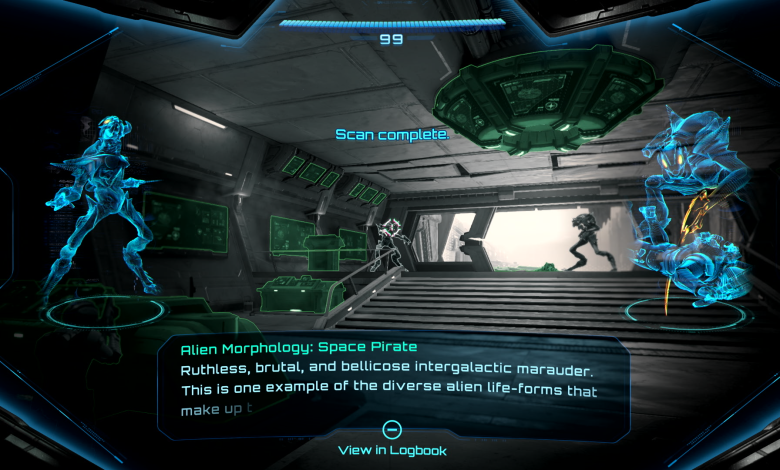
Anyone who has played a Metroid Prime before probably knows how important it is to scan every enemy, pickup, powerup, and general object in the environment, both for the sake of fully understanding the game’s lore, and for 100% completion.
However, it is especially important to get these scans in the opening segment of the game at the UTO Research Facility because while there are lot of interesting things on this planet that will not appear for the rest of the game, there are three essential scans to record into your Logbook that you can easily miss! These include:
- A Space Pirate (not the injured ones sitting on the ground!)
- A Galactic Federation Soldier
- The tutorial boss, Aberax
As you progress into planet Viewros, most other important scans can be scanned at any time, but you’ll still want to be sure to scan any bosses or minibosses you encounter (and any extensions of them they may create). You should also consult your Logbook to know which scans count toward 100% completion, which include:
- Enemies and Allies
- Certain Flora and Fauna
- Machines
- Lamorn Lore Tablets and Logs
- Major Technology (Save Stations, Grapple Nodes, etc)
Find a Button Map That Works For You
Most people will probably default to using the B button to jump, since it’s the most natural mapping. However, in frantic moments of combat, you’ll find it kind of difficult to jump and aim at the same time, since your thumb will need to leave the right stick in order to press the B button.
Fortunately, the developers have mapped an alternate jump button on L, allowing you to do some bumper jumping! I learned about this about halfway through my playtime with Metroid Prime 4, and it dramatically helped us in certain boss fights that demanded both accuracy and evasion in equal measure.
Early Energy Tanks
You’ll get two energy tanks pretty much right away without even having to really search for them. After that though, energy tanks become a rare commodity, and most are locked behind late game upgrades and boss fights. However there are two more that you can get pretty early on and will be a significant boon in the early game.
For the first one, all you need is your Psychic Glove, and the Vi-O-La Suit that lets you drive your motorcycle in the desert. Search the desert southeast of the Chrono Tower for a lone statue to reach the Ring of Thunder Shrine. Just behind the shrine is a spot for you to grab with the Psychic Glove, allowing you to pull down a door revealing an Energy Tank hiding inside.
The second one can be found at the Ladder of Thought Shrine on the western edge of the Sol Valley, just north of the Entrance to Fury Green. Once you have obtained the Fire Shot, you can solve the puzzle inside by lifting the pillars one after the other, and then hop to the platform with the door and check to your right to find a hole that you can fit through while in ball form.
To reach it, you’ll need to do a classic Metroid bomb jump. Thankfully, Samus has the ability to jump in bomb form now, so jump into the air and place a bomb in mid-air. Wait a second, and then right before the bomb detonates, jump again to get boosted into the hole. On the other side, you’ll find the Energy Tank!
Don’t Skip Green Crystals
As you’re driving around the desert, you’ll notice a whole lot of green crystals that you can plow through. You’re given a spiel early in the game about how you need to preserve the Lamorn’s legacy by getting their psychic fruit from a tree, and these crystals factor into that. It may not seem like it at the time, but this is an unavoidable main objective Samus has, and you won’t be able to complete your adventure until you collect a LOT of green crystals.
Trust us when we say that you’ll save yourself a big headache in the endgame if you’re vigilant about always collecting them whenever you see them early on. You don’t necessarily need to comb the desert at the earlier opportunity, but you should aim to try and mow down all the clusters you spot when moving across the desert to your next objective, or exploring near a newly spotted Lamorn Shrine. If an objective calls for you to return to a previously explored area, consider taking a different route to find a few more crystals!
It’s also worth noting the spots where large ore chunks appear around crystals. You won’t be able to blast them open until the endgame, but once you can, each ore chunk gives you a massive amount!
Get The First Green Crystal Upgrade Sooner Rather than Later
Okay, I know this kind of flies counter to what I just said about not going out of your way for these green crystals, but you actually should aim to get the first reward for finding enough of them to fill up to the first line over on the mission tab where it tracks your green crystal progress.
Once you do that, head back to home base, dump them at the Altar of Legacy, and you’ll get an upgrade to your arm cannon that increases its base damage.
Explore the Desert for More Upgrades
Keep an eye out while you’re exploring the desert for other goodies as well. Don’t worry about the mech part points of interest on the map, as they’re part of a late game mission, but do be on the lookout for glowing spots on the ground where you can use your grapple to unearth powerups, ramps that lead to missile expansions suspended in the air, and especially shrines, as these will power up your elemental shots with special charged shots.
Each of the elemental shots you will obtain have two different upgrades: A Charged Shot, and a Super Charged Shot, and you’ll want to unlock them as soon as you can enter those shrines.
If you come across these shrines early, there’s a good chance you won’t have the upgrade needed to solve their puzzles, but fortunately they are automatically marked on your map when you discover them, so you can always come back later once you have the required upgrade.
Remember Scout Bot Locations
As you’re exploring each new area, you’ll probably come across these downed scout bots that may not seem very important at first glance, but if you scan them, you’ll see that they can actually be reactivated with an electric jolt.
Make a mark on your map noting the locations of these bots, because once you get the Thunder Shot and can reactivate them, they’ll actually tell you where all the remaining collectibles in that area are.
The Thunder Shot is one of the very last core upgrades you’ll get, so you won’t be able to do this until fairly late in the game, which is why its important to mark them early on, so you don’t forget where they are.
This is especially important for the one in Sol Valley, given the size of the region. Luckily, that bot can be found just north of the entrance to Volt Forge on an isolated platform that you can jump to using your Psychic Boots.
Place Markers On Your Map
Speaking of marking your map, you should be doing this every time you come across a power up you can’t find a way to reach, a breakable object that you can’t currently break, a gap you can’t cross, etc.
This is a new feature in Metroid Prime 4 and while you’re not able to specifically mark locations on the 3D map, even just highlighting an area green so that you know to revisit it when you have new upgrades is super valuable.
The catch is that the markers are a little basic, and the icons relate more to what you’re trying to get rather than what you need to unlock the way. Because of this, we recommend creating a system where the different markers correspond to the different types of barriers that are blocking you, so that you know what to look for when you come back with more upgrades. For example, use the skull icon to note things that require a morph ball upgrades like the Boost Ball or Spider Ball.
Look for Enemy Weaknesses to Exploit
Don’t neglect your elemental shots! Ice enemies are typically weak to fire, mechanical enemies take more damage from your electric shot, and flying enemies will fall from the sky when they’re frozen by your ice shot, taking damage and potentially even shattering when they hit the ground.
Also note that freezing an enemy and then quickly switching to missiles is a great way to quickly bring down some of the more resilient enemies in the game.
Your Bike’s Most Powerful Weapon is the Boost
It can be frustrating to take down some of the enemies that roam the desert and harass you while you’re driving around with your bike’s standard lock-on weapon. It’s both slow and it takes multiple shots to bring down anything but the birds.
The real value of the weapon isn’t taking out enemies on its own, it’s knocking them out of the sky temporarily so that you can double tap boost and plow right through them, killing them in one blow. Save your boosts for opportunities to take out the enemies you swat out of the sky, and plow through these cacti to restore the boost so that you’re always ready whenever you get ambushed.
Master the Free Aiming During Lock-on
Lock on is a very powerful tool in Metroid Prime 4, but sometimes free aim is the way to go. Definitely use lock on to keep your sights on a fast moving target, but in situations where you need to be precise and where the lock on moves your crosshairs away from the enemy weak points, you’ll be better off just using free-aim.
This is especially true for bosses, where you’ll frequently only be able to target the head of a boss, but are required to shoot other parts of its body in order to deal damage.